Snickerdoodle Ice Cream

Although my Kitchen Aid ice cream maker attachment is all mine, I’ve mainly used it to make chocolate-based ice creams because the boyfriend likes chocolate.

Call me insane. Call me nuts. Call me whatever you want, but here’s the truth: I’m not a fan of chocolate.

Shocking, I know.

Unless there’s marshmallow, caramel, peanut butter, or fruit involved, I won’t eat chocolate. The boy (and most of society) is pretty much the opposite.

Well, I wanted to make my own batch of ice cream. Just for me. Nyah-nyah-nyah-nyah-poo-poo!

Snickerdoodle Ice Cream
Loosely based off of this recipe.
Makes about one quart.

  • 1 can sweetened condensed milk (don’t use low-fat or fat-free unless you want icey ice cream!)
  • 2 cups cream
  • 1 tbsp + 1 tsp cinnamon (I used Saigon Cinnamon, my favorite!)
  • 1 tsp vanilla extract (pure is best!)
  • 1/2 cup caramel sauce (I used home-made; see recipe at the end)

Make sure your ice cream maker bowl is thoroughly frozen. (I keep mine in the freezer at all times!)

In a medium bowl, whisk together all ingredients except caramel sauce. Follow directions on your ice cream maker. After about 20 minutes of churning, put enough ice cream in a freezer-safe bowl to cover the bottom. Drizzle some of the caramel sauce on top. Continue to layer like this, ending with ice cream on top. Cover and freeze for at least 2 hours so you can scoop it.

Ridiculously Easy Vegan Caramel Sauce
Makes about 1-1/4 cup.
Inspired by this recipe.

  • 3/4 cup non-dairy milk (I used almond)
  • 3/4 cup sugar of choice (I used organic granulated)
  • 1/3 cup liquid sugar (I used maple syrup)
  • 1 tbsp corn starch (or arrowroot, if you have it)
  • 1 tbsp water
  • 2 tbsp vegan butter (I used Soy-Free Earth Balance)
  • 1 tbsp vanilla extract (pure is best!)

Whisk the milk, sugar, liquid sugar in a medium saucepan over medium heat until combined. Continue whisking over medium heat for about 3 minutes. In a separate bowl or cup, whisk the water and corn starch until no lumps remain. Add to the saucepan and whisk until combined.

Continue to cook the mixture until it thickens and is golden. Remove from heat and add the remaining ingredients, whisking until completely combined.

If you add this to ice cream, like the recipe above, let it cool completely first! If you want to use it as a topping, microwave in 10-second intervals for it to be more pour-able.

Four-Ingredient Egg-less Chocolate Ice Cream

Sometimes when the proverbial shit hits the fan, you need to take a step back and find something good to focus on. This recipe is just that.

When my boyfriend bought me an ice cream maker attachment for my Kitchen Aid mixer, I was absolutely ecstatic in anticipation of making ice cream all the time… until I realized most recipes take a good amount of work as much as a day before you actually want to churn your ice cream (not to mention the couple of hours you have to wait for it to harden to a scoop-able consistency)!

When I want ice cream, I want it to enter my mouth as fast as possible.

I guarantee that this ice cream will be the creamiest, yummiest, not-too-sweetiest of its kind. Oh, I forgot to mention how freaking simple it is to make! Literally four simple ingredients… it can’t get much better than that!

Four-Ingredient Egg-less Chocolate Ice Cream
From here, and many other places on the web.
Makes about a quart.

  • 1 can sweetened condensed milk (do not use fat-free or low-fat unless you want icey ice cream)
  • 2 cups cream
  • 1 tsp vanilla extract (pure is best!)
  • 1/3 cup cocoa powder

Make sure your ice cream maker bowl is thoroughly frozen. (I keep mine in the freezer at all times!)

In a medium bowl, whisk together all ingredients. Follow directions on your ice cream maker. After about 20 minutes of churning, put in a freezer-safe bowl, cover, and let freeze for at least 2 hours if you want to scoop it.

Devour.

The best thing about this base is that it’s just so darn… basic! Omit the cocoa powder and you will have vanilla ice cream. About 15 minutes into the churning, add whatever mix-ins you want. (We chose those new super-mini Reese’s Peanut Butter Cups.) You can really do whatever you want with this recipe to come up with your own unique flavor.

In fact, I’ll share another great, easy recipe with you soon. Whoever you are.

Ice cream will make even the worst days, weeks, or months just a little bit better.

Glitz and Glamor

I must say, I have some awesome friends. One in particular loves movies just as much (if not more) than my boyfriend and I. Hard to believe, given the fact that we go to the movies around twice per month (sometimes more!).

Well, this friend of mine hosts some fun movie-themed parties in the — get this — movie theatre room (!!!) in his apartment’s rec area. On Oscar night, he hosted a red carpet party with… well… betting.

I haven’t watched the Oscars since Lord of the Rings was nominated. I’d actually watch the entire show from beginning to end just to see if it won best picture and if Peter Jackson would win best director. (It took him until the third movie to win, ugh!)

To make it interesting, as I mentioned, there was betting at this party. $5 into the pot, you get a ballot. Whoever guesses the most right wins the pot.

I lost my $5. But I ate well, and that’s what makes me truly happy!

Wine, baked goods, snacks, popcorn… all good! But, what did I bring?

These bad boys! Now, I’m not going to post the cupcake recipe. It was okay, not great, not special… edible, chocolatey, and pretty good. Just not blog-worthy, really.

Now, this frosting… it’s more than worthy of this post. It is officially my favorite frosting ever. I thought I loved buttercream, then I met this frosting.

If you like frostings that are over-the-top with sweetness, this isn’t for you. If you want to coat your kitchen in powdered sugar, look elsewhere. This frosting is grown up. A fluffy whipped-cream texture, perfectly pipe-able, spreadable, and lick-able off of a spoon. If you use clear extract or vanilla beans, it will be a striking white color, as the blogger I’m crediting for this recipe shows in her post.

Funny thing is, I initially chose this recipe because I had no powdered sugar on hand and needed frosting. Also, it can easily be adapted to be made vegan. Bottom line: get ready to go ga-ga when you make this stuff.

Seriously Awesome Frosting
Makes about 4 cups, enough to frost 24+ cupcakes, easily.
From this genius recipe.

  • 5 tbsp flour
  • 1 cup milk
  • 1 tsp vanilla
  • 1 cup butter
  • 1 cup granulated (not powdered!) sugar
  • Combine the flour and milk in a saucepan on medium-high heat. It will start to clump together in a dough-like consistency. (This is called a roux and is the base for creamy things like alfredo and other cheesy sauces.) Put in the fridge to cool.

    In a stand mixer (or a bowl using a hand-mixer) whisk together the butter, sugar, and vanilla until light and fluffly and all of the sugar crystals have dissolved. Add the cooled roux and whisk vigorously (!!!) until fluffy like whipped cream. (This took me about 2 minutes of whipping.)

    Taste it. Love it. Frost with it. Eat leftovers using just a spoon. Put a glob of it on top of ice cream or sandwiched between cookies. Enjoy its divinity.

I rolled my mini-cupcakes around in some glittery silver sugar to fit the glamorous theme of the Oscars. (I wish I had gold though!)

Some comments on the frosting recipe say that it does not hold up well when it’s not cold. These cupcakes sat at room temperature for about 2 hours and were perfectly fine. They were also delicious the next day when I took the leftovers to work.

The perfect frosting? I think so!

Basic Crepes

I’ve always been intimidated by crepes. First of all, anything from the French cuisine immediately makes me nervous to make (but I’ll gladly eat it all). Secondly… brace yourselves… I don’t like pancakes, so I rarely make them (unless the boyfriend asks nicely, and I have Bisquick mix on hand). My inexperience combined with my hesitation to cook anything Frenchy meant that, until last weekend, crepes were something I could only have in a restaurant.

Most of my cooking decisions are random, and Saturday morning was no exception. I was awake, the boy was still asleep, so I hunted online for an easy crepe recipe. All of the ones I found online required batter to sit refrigerated for at least an hour before the actual cooking occured, but I wanted crepes ASAP!

I finally came upon a recipe that would supposedly give me delicious, thin crepes in about 15-20 minutes from start to finish. Supposedly. This assumes I don’t let the intimidation get the best of me!

Luckily, I survived, as did my crepes (except for one…)! On the left you have mine filled with almond butter and chopped up apples that had been cooked with butter, topped with plenty of Saigon cinnamon. My boyfriend, whose palette is less refined, had his filled with peanut butter and topped with chocolate syrup.

Much to my pleasant surprise, the picky boy I love said he’d eat them again — a huge success that has only occurred less than a handful of times in the eight years we’ve been together. If the boy likes it, the recipe is an immediate winner. With the weekend coming up, this recipe should be on your mind as a great brunch option. I bet you have all of the ingredients on hand… so, no excuses! (Not even fear of French cooking!)

Note: It’s been a few days since I made these, and I’ve lost the recipe that I found! When I do find it, I’ll give credit to the originator, even though I made my own tweaks to it.

Basic Crepes
Makes 6 crepes, serves three.

For basic crepes, all you need is:

  • 1 cup all-purpose unbleached flour
  • 1 cup milk of choice, plus a few tablespoons (I used unsweetened almond milk)
  • 1 egg

If you want your crepes to be sweet, also add:

  • 1 tsp vanilla extract
  • 2 tbsp sweetener of your choice (I used honey, but you can use maple syrup, agave, etc.)

Whisk all ingredients in a bowl until combined. If the batter seems too thick, add additional milk. Remember, you need it to be thinner than pancake batter so it will be thin enough to roll, fold, or wrap around your filling of choice. I made sure mine was about the consistency of Elmer’s glue.

Heat a large pan over medium-high heat. Very lightly spray with non-stick cooking spray. When pan is hot, pour 1/4 cup of batter into center. Immediately tilt your pan so that the batter spreads as far and thin as possible. (Mine never did coat my entire 9″ pan; it maybe reached 7″.)

When the edges start to pull away from the pan and the top is beginning to get a bit dry, it’s time to flip! It took my crepes less than 3 minutes to reach that stage of done-ness. Flip your crepe, then let it cook on the opposite side for an additional minute. Remove the crepe from the pan and repeat all steps with remaining batter. Fill with your fillings of choice!

You can see that I rolled mine, but two local creperies in my neighborhood folds them into a triangular shape with the fillings inside.

This website has a really comprehensive list of traditional crepe fillings if you need some inspiration… but I’m sure you have plenty of stuff on-hand you can use. Just get creative! Your taste buds will love these crepes no matter what.

Caramel: A Delicious Failure

I had some chicken soup in my Crock Pot, so with two hours to kill Saturday night, I decided to kill the time by doing yet another culinary experiment: caramel.

I’m not a chocolate-lover in the least (though I definitely enjoy it a little more than I used to, now that I’ve discovered high-quality chocolate!) but I love two things in place of the common chocoholism: marshmallows and caramel. I’ve failed at making marshmallows before… and maybe someday I’ll try to do it again… but I don’t think I’m ready to give it another go for a while.

Caramel. Seems easy enough, right? Sugar, sometimes water (if you do it the “wet” way), butter, and cream. I found a recipe online, which I won’t bother posting because I definitely don’t have good things to say about the way the steps were described.

The recipe was to yield one cup of caramel sauce.

Obviously this is not caramel sauce!

I’m not going to bother with a recipe because I honestly just winged it! In essence, I failed… but it resulted in something delicious: chewy vanilla caramel!

Next time I plan on using this recipe because I love this blogger, and her instructions and photos are a lot clearer. What helped me get through my mistakes on Saturday night was this recipe by the talented David Lebowitz. He’s possibly my culinary hero, as I’ve been following his blog for a while. If it wasn’t for his recipe, I’d have wasted an entire vanilla bean ($3.75!!!), 3/4 cup of cream, delicious high-quality butter, and 2 cups of organic sugar (not cheap!!!). Thank you, Mr. Lebowitz, for saving my caramel disaster and making it only a quasi-failure that was still edible (and delicious)!

Until next time…!

Birthday Ice Cream

Friday was the boyfriend’s 27th birthday, and he didn’t want a gift. As a lover of gift-giving, it was hard for me to exactly obey this! I enjoy cooking and baking for him (and others, including me, of course!) so I knew that making him a birthday meal or dessert would be in order, and not exactly breaking his no-gift wish… right?

The guy eats very basic things, as I’ve mentioned once or twice, and most of it is that of a college kid (or younger… haha!): pasta with sauce, hamburgers, pizza, the occasional salad (consisting of nothing more than lettuce, cucumber, and ranch dressing), peanut butter sandwiches… you get the idea, yeah?

One of the meals that’s easiest for me to make for him while still being able to be creative is dessert. A new brownie recipe, not from a box. A cookie with a random assortment of mix-ins from our pantry. Cupcakes, bars, or cakes from a recipe I found online. As long as there isn’t any fruit in it, he’ll eat it. (As a fruit-lover, I’m still not over the fact he won’t touch a single, solitary fruit. What a weirdo I fell in love with, huh?!)

Knowing that I love to cook, and also knowing that at least half of the things I cook in our kitchen can be eaten by him, the boy got me the ice cream maker attachment for my Kitchen Aid stand mixer for this past Chanukah. I’ve made a batch of chocolate chip ice cream with it already and though it was delicious, it wasn’t made the hard way: custard. I can be lazy at times, so when I saw that most of the ice cream recipes out there require the base to be cooked over heat, then cooled for at least 8 hours, I simply thought, “Helllll no! That’s too much time! I want ice cream now!”

Well, my boyfriend is worth the preparation.

I’d been holding onto this recipe for a while, because it contains my boyfriend’s favorite flavor combination: chocolate and peanut butter. Seriously, this guy goes ga-ga over the stuff. I knew this would be a winner, and it was. Though I used regular cocoa powder and not Dutch processed, it was plenty rich! The texture was so creamy, it puts my quickly-made vanilla to shame. I’m not even a fan of chocolate, but you’d better believe that I licked the beaters clean… and scraped the ice cream maker bowl clean…! Give this recipe a try; you won’t be disappointed!

So, we stayed in. I made the base the day before his big day. I threw it in my machine, chopping two dozen peanut butter cups while it churned. We ordered pizza delivery from our favorite place. We got a DVD from Redbox and plopped on the sofa while the quart and a half of frozen confection froze. Then… it was birthday time.

Happy birthday, love.

New Things #4 & #5: Double-Feature!

I’ve been away a lot lately. I started a new position at work which has resulted in me traveling probably 80% of the time since I began the job. It’s hard going from seeing my boyfriend every day after work to seeing him practically just on the weekends!

He doesn’t cook much, so I try to do some food-shopping with him before I go on long trips so he can have stuff to eat that isn’t fast-food or Chinese delivery. Besides that, I also like cooking and/or baking him something he loves before I leave, so he can have a taste of real cooking (as opposed to his Chef Boyardee and ramen noodles).

I decided to spoil him a bit by making something not as healthy and wholesome as I usually do: cookies. We had all the ingredients, as well as lots of mix-ins like chocolate chips and M&Ms. I never made cookies with M&Ms or any candies in them before, so I was pretty excited to give it a go. But, I came into a problem: I assumed I had brown sugar in my pantry when, in fact, I didn’t. Crisis? Nah.

Did you know you can make your own brown sugar? I feel dumb for not knowing this to be true!

To make molasses, the cane of a sugar plant is harvested and stripped of its leaves. Its juice is extracted usually by crushing or mashing, but also by cutting. The juice is boiled to concentrate it, which promotes the crystallisation of the sugar. The result of this first boiling and of the sugar crystals is first molasses, which has the highest sugar content because comparatively little sugar has been extracted from the source. Second molasses is created from a second boiling and sugar extraction, and has a slight bitter tinge to its taste.

[source]

Well, I had blackstrap molasses in my possession. I knew it was a healthy product, which is why I bought it, but I’d only ever used it to make a healthy, whole-grain molasses/ginger bread for a friend. So, what is it?

The third boiling of the sugar syrup makes blackstrap molasses. The term is an Americanism dating from around 1920. The majority of sucrose from the original juice has been crystallized and removed. The calorie content of blackstrap molasses is still mostly from the small remaining sugar content. However, unlike refined sugars, it contains trace amounts of vitamins and significant amounts of several minerals. Blackstrap molasses is a source of calcium, magnesium, potassium, and iron; one tablespoon provides up to 20% of the daily value of each of those nutrients. Blackstrap has long been sold as a health supplement.

With a bit of worry that my final product would be bitter, I dug up the sugar and the molasses I had in my pantry and prepared to make brown sugar!

How to Make Brown Sugar
From here.

For every cup of brown sugar you need, get…

  • 1 cup sugar (preferably organic)
  • 1 tbsp molasses

I only needed 3/4 cup so I added 3/4 cup of sugar to a medium bowl and topped it with about 3/4 tablespoon of molasses.

I just whisked like crazy and in about a minute I had the fluffiest brown sugar ever!

With all of the nutrients blackstrap molasses has, my cookies are about as healthy as cookies can get… or at least that what I’m convincing myself! Hah!

One-Bowl Chocolate Chip M&M Cookies
Adapted from the Cranberry-Chocolate Cookies recipe on the side of my King Arthur White Whole Wheat Pastry Flour bag. Yields about 18 cookies.

  • 1/2 cup unsalted butter, margerine, or other bake-friendly spread
  • 3/4 cup brown sugar, packed
  • 1 tsp vanilla extract
  • 1/2 tsp baking powder
  • 1/4 tsp baking soda
  • 1/4 tsp salt
  • 1 egg
  • 1-1/4 cup King Arthur White Whole Wheat Flour
  • 1 cup semi-sweet chocolate chips (I used Ghirardelli)
  • about 1/2 cup M&Ms

Preheat your oven to 350 degrees F and line a cookie sheet with parchment paper.

In a large bowl, cream together the brown sugar, vanilla, butter, baking soda, baking powder, and salt. (If you make your brown sugar from scratch, just use the same bowl!) Beat in the egg until completely combined.

Scrape the sides and bottom of the bowl with a spatula, then add the flour, mixing until combined. Stir in chocolate chips.

Using a small cookie scoop, space balls of dough about 1.5 inches apart. Flatten with your palm or a spatula to flatten out top. Add 3 M&Ms on top of each cookie.

Bake for 10-12 minutes or until golden brown on edges. Let cool on the cookie sheet for 2 minutes, then move to a cooling rack.

There are no photos of the cookies, sorry. But all you have to do is imagine some imagery of delicious, sweet perfection… the smell of the Keebler Elves’ tree… and the taste of pure joy…!

Hello, Autumn!

Farewell, summer: today is the Autumnal Equinox!

Summer may be the season all kids (and teachers) love, but as an adult I personally love Fall. Hell, even as a kid I loved fall!

Autumn is when the leaves change to shades of pure warmth.

Summer may be s’mores season, but Autumn is Mallomars season!

Some of my favorite holidays are in the Fall season: Rosh Hashannah/Yom Kippur, Thanksgiving, and [topping the list…] Halloween!

Every Sunday (and sometimes Monday) in the Autumn season involves me yelling at the TV, with the assumption that my beloved Giants can hear my cheers.

Autumnal fashions of fingerless gloves, skinny jeans, and Toms Botas.

The best day of Autumn is November 1st, of course *ahem*mybirthday*ahem*

Fall treats truly are the best: pumpkin spice lattes, candy corn, caramel apples… oh my!

Or, if you’re up for the true Autumn experience, picking your own pumpkins and apples from your local farm!

Speaking of which, I came upon some local apples that are about the size of a softball. I had just one left earlier this week and decided to use it to make something for my coworkers.

I bake something to bring to work about once a month, at most. I used to do this more often, but I definitely spoiled them to the point that they’d get upset if I didn’t bring something in every Monday morning! I’ve got to pace myself…!

So, what to do with a huge apple? I like the nontraditional. I like blowing people’s minds (especially with food). I like trying new things… obviously… so I decided to bake something I’d never attempted before: whoopie pies.

I’d never heard of whoopie pies until I moved to Boston for college. Apparently New England claims they created whoopie pies first (though Pennsylvanians disagree), so many families, supermarkets, and bakeries have their own secret recipes for this awesome treat. The first one I had was traditional: marshmallow cream in between two chocolate cakes, made by my college friend’s older brother. Ahhhhmazing!

But, how do I go about making these with a humongous apple? When in doubt, ask Google. Using the cookies from this recipe and a modified version of the cream from this recipe, my problem was solved!

Apple Cinnamon Whoopie Pies

Apple-Cinnamon Whoopie Pies
Yields about 13 sandwich cookies + some leftover icing.

For the cookies:

  • 1 1/8 cups all-purpose flour
  • 2 teaspoon cinnamon
  • 1/2 teaspoon baking soda
  • 1/2 teaspoon salt
  • 1 stick (1/2 cup) unsalted butter, softened
  • 2/3 cup brown sugar
  • 1 large egg
  • 1/2 teaspoon vanilla
  • 1 cup grated apple, peeled first (one huge apple was enough!)

For the filling:

  • 3/4 block of cream cheese, softened
  • 2 cups powdered sugar
  • 1/2 tsp cinnamon
  • 1/2 tsp nutmeg
  • 1/4 tsp vanilla extract
  • 2 tablespoons coconut oil

In a stand mixer using the whisk attachment, cream the softened butter and brown sugar. Add vanilla and egg. When combined, add all remaining ingredients except the apple. Once dough is thoroughly mixed, reduce speed, add the mixing attachment, and add apple. Cover dough and refrigerate for about 45-60 minutes. (I refrigerated mine for about 50 minutes.)

During your wait, make the frosting. In a stand mixer using the whisk attachment, combine cream cheese, coconut oil, and vanilla. When completely smooth, begin adding powdered sugar in 1/2 cup increments. Add nutmeg and cinnamon, whisking until combined. Refrigerate until use.

When your dough is done in the fridge, preheat oven to 325 degrees F and line a cookie sheet with parchment paper or a Silpat. Drop balls of dough onto your lined cookie sheet using a heaping teaspoon or a cookie scoop. Flatten each ball slightly using the back of a spoon, trying to keep each round about the same size.

Bake for 12-15 minutes (mine were done at 12 minutes exactly) or until golden around the edges. Keep cookies on the cookie sheet for at least 2 minutes before moving them to a cooling rack.

Once completely cooled (I recommend letting them cool in your refrigerator), put a heaping tablespoon of filling in between two sort-of-equally-sized cookies.

Needless to say, these disappeared in record time when I brought them to the office. Nobody knew what a whoopie pie was, so I had to actually draw an illustration explaining what each component was! Regardless, they were enjoyed by all and definitely a great way to welcome Autumn into our lives.

Yeah, I’m the best coworker ever. 🙂

What I Ate Wednesday (WIAW)

I follow a lot of awesome food blogs, health/wellness blogs, and other web sites and enjoy when they do “What I Ate Wednesday” posts. So, here’s my first!

On Wednesday 9/14/11 I enjoyed…

Fall officially begins when Pumpkin Spice Lattes return!
Starbucks soy pumpkin spice latte + “Two Moms in the Raw” blueberry granola bar (not pictured because I forgot!).

Soba noodles are amazing!
Lunch was cold soba noodles that I cooked last night and let marinate in the fridge all night and all morning in tamari soy sauce, minced garlic, and sesame oil. I topped it with some fresh basil.

Almond love!
Raw almonds for my afternoon snack, alongside a cup of coffee (not pictured because, again, I forgot!).

image
Creamy polenta with fresh basil (served with sautéed garlic spinach, not shown).

image
From-scratch vegan hot chocolate… check out this recipe I randomly thought of (because we are out of both dairy milk and non-dairy milk… whoops)!

Vegan Hot Chocolate
Serves two.

  • 1-1/4 cups water
  • 1/2 cup reduced fat coconut milk
  • 1/4 cup raw or turbinado sugar
  • 1/4 teaspoon vanilla extract
  • 2 ounces semisweet chocolate (Ghirardelli semisweet bars are vegan)

Combine water, coconut milk, and vanilla in a small saucepan and heat on high until boiling. Add sugar and whisk until dissolved. Lower heat to medium-low and add chocolate, whisking until completely melted.

Pour in two mugs of your choosing, but beware: this stuff is molten hot and we needed to let ours cool for about 8 minutes before it was drinkable!

The good, the bad and the tasty.

It’s our intern’s 20th birthday, so I took the liberty of being a good role model (a whopping 5 years older than her, but whatever) and giving her a nice gift – food!

Cupcakes, to be specific.

I asked her what her favorite baked good is and she gave me a wordy response that included “chocolate cake or cupcakes” and “strawberries” somewhere in it. Well, following the crazy cupcake trend that’s been spreading throughout the world, I made a nice batch of chocolate-strawberry cupcakes for her.

image

I used this recipe for the chocolate cupcakes but substituted mayonnaise in place of the sour cream. (You’ve got to work with what you’ve got! You can also use yogurt in place of sour cream or mayo.)

For the buttercream frosting, I basically followed my go-to recipe. I used to be awful at making buttercream frosting, but I soon learned some tricks:

  1. Don’t be scared of butter! I used to try to use margerine, but it never held and would melt like crazy. No matter how much powdered sugar I’d add, it would never get stiff. Use butter. (I will post, in due time, a recipe for vegan “butter”cream frosting.)
  2. You don’t need to be exact. I used to measure every half or quarter cup of powdered sugar… every single 1/8 teaspoon of extract. No need! Temperature, age of the butter, how long the sugar has been sitting in your pantry, etc. all affects how things will turn out, so scrutinizing your measurements with something as simple as frosting is a waste of time. Just taste and test as you go, that’s it.
  3. Get a good mixer. Before I had my Kitchenaid mixer, I had a standing mixer I got for free from my boyfriend’s mom, who got it for cheap at a garage sale. It did its job for a while, but it took forever for frosting (or anything, for that matter!) to come together. Since I was very very young, I dreamed of owning a Kitchenaid stand mixer, and finally I was able to get one after winning a gift card to Amazon.com. I love it, and it makes mixing, beating, whipping, etc. infinitely easier!

Now, onto the recipe.

Stupidly Simple Buttercream
Makes enough to frost & fill 12 cupcakes… at least!

  • 1 stick of butter @ room temperature
  • roughly 1/3 of a 5lb bag of powdered sugar
  • a few drops of vanilla extract
  • a drizzle of whipping cream

In a standing mixer (or using a hand-held mixer… or using a whisk, if you’re super-strong) beat the butter and vanilla extract until smooth. Keeping the mixer on medium-high, add the powdered sugar in small batches, scraping down the sides of the bowl when necessary. Continue adding until the frosting is stiff but spreadable.

Add the whipping cream while the mixer is still running. Add powdered sugar if you notice the frosting is too wet and/or won’t hold its shape. Frost cooled cake or cupcakes. Lick the beater until clean, too.

Tip: To get your butter at room temperature in a pinch, put the stick in the microwave for 10-12 seconds.

I made my batch into strawberry buttercream by adding a few heaping spoonfuls of strawberry jam (100% fruit, no added sugar or other garbage). You can use any jam, obviously, to make custom fruity frostings.

You can make chocolate buttercream by adding about 1/4 cup of cocoa powder before you add the cream.

Replace the vanilla extract with any extract you’d like to make it unique. Peppermint, butter, almond, orange… get creative!

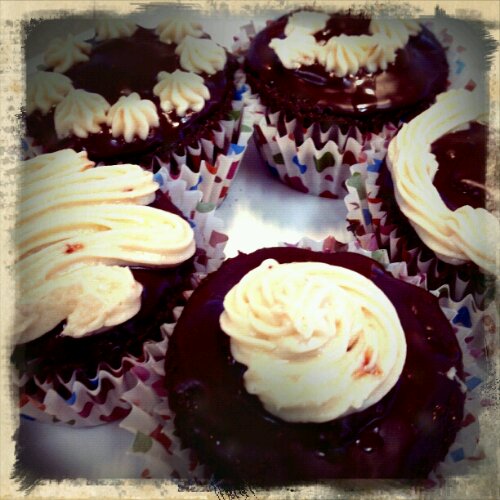
I decided to add a little finesse to my cupcakes by not only filling each cupcake with a little of the buttercream, but I also dunked the tops of each in chocolate ganache before piping the frosting on top.

Booya.

Definitely not health food… and you can bet that after licking the cake batter bowl clean and licking my Kitchenaid mixer’s whisk attachment free of frosting that I went for a 40-minute run up and down stadium stairs! All the pain was worth seeing my coworkers – especially the birthday girl! – enjoy the treats.